Smiles of ‘hoppiness’ all-round with easy Easter crafts for kids and all the family


With another month or so of lockdown on the cards, thinking of new things to do to keep the little ankle-biters entertained isn’t always easy.
And with April showers and unpredictable spring weather often meaning we have to look indoors for our activity inspiration, now’s the perfect time to get your craft kit prepared for some ‘kid friendly’ seasonal creations.
We typically spend Easter with family. And with that not being an option again this year, it’s time to think of some simple ways to keep the kid’s smiling and ‘egg-cited’ during another school holiday.
So, to celebrate the season, why not spend your time creating some cracking Easter crafts that all the family will enjoy?
The team at Edukit is here to help, sharing their selection of Easter craft ideas perfect for pre-schoolers and more challenging variations for older children.
With useful tips and guidance for all age groups, keeping the whole family entertained during the Easter holidays will be a breeze.
From bouncing bunny ears to egg-cellent egg decorating, we have shared our range of easy Easter arts and crafts to put smiles on your kid’s faces, keeping everyone ‘hoppy’.
Cracking 3D craft card eggs
Easter and eggs go hand in hand, and this craft will undoubtedly keep those little fingertips busy over the school holidays.
What you’ll need
To get cracking with this craft, you’ll need a selection of craft card sheets in various colours, a glue stick, scissors and embellishments.
If you want to step up your craft for older children, you’ll also need additional card, string and a glue gun for the bunting.
Step 1
To start making your large, free-standing egg, you’ll need ten sheets of card in your selected spring colours.
Once you have your chosen card, you’ll need to start by drawing an egg-cellent egg-shaped template on a piece of paper and cut this out.
Once you have your cut-out egg shape, cut this in half lengthways.
Download a PDF template by clicking on the image below.
Step 2
Once you have one egg shape template, you can start using your ten sheets of card to create your design.
Grab your pieces of coloured card and fold these in half lengthways.
Step 3
Get your egg template and put this on the straight edge of the fold of the coloured card, draw around the template and cut out.
Repeat this with the remaining card sheets.
Step 4
Once you have created all ten of your egg-shaped card pieces, lay these out onto a table whilst keeping them all neatly folded.
With the eggs still folded, add glue to the top side of your card. Pick up another piece of card and place this on top to secure it in place.
This step will need to be repeated until all the eggs are glued together in a stack.
Step 5
Once your egg stack has been made, lift the top card and concertina this to reach the top side of the bottom egg to make this into a 3D shape.
And now, the time has then come to decorate your egg; make it as bold and beautiful as you like - there’s no time to waste, get cracking and get creative!
Top tip:
If you’ve noticed your shapes aren’t perfectly aligned, that’s ok. You can easily trim the edges to ensure your design looks as egg-squisite as possible.
Step it up
You can step up your craft by making smaller eggs from card and hanging them on a piece of string like bunting.
Perfect to decorate your home for an egg-stravagant Easter party at home with the family, all you’ll need to do is split one sheet into four smaller rectangles to create small egg shapes.
A good tip to ensure your egg shape stays flat on one side is to use a thicker card or cardboard to glue the egg shapes to.
Once you have cut out your shapes, you can then attach these with glue to a piece of string to hang as bunting around the home as you celebrate the Easter bunny’s impending arrival.
Bouncing bunny ears headband

Are you ready to make it a ‘hoppy’ Easter holiday for all the family?
Well, nothing says spring and signals the arrival of Easter like a pair of bunny ears, so why not create your very own to wear ahead of the big day?
This bunny ears headband is the perfect quick and easy Easter craft to tame your bouncing bunnies during the school holidays, keeping them entertained for the day.
What you’ll need
So let’s hop to it.
For this craft, you’ll need an A4 craft foam sheet in pink, grey or brown to become the body of your bunny, a sheet of A4 craft felt in white for the ears, a thin piece of elastic, craft glue or glue dots and self-adhesive foam shapes.
Step 1
First up, you’ll need to hold your craft foam landscape and cut a 6cm strip along the top or bottom.
This strip of foam will be the base for your bouncing bunnies headband.
Download a PDF template by clicking on the image below.
Step 2
And now’s the fun part - getting ready to decorate.
Using the same sheet of craft foam, outline two bunny ear shapes, and leave a little extra material for a ‘tab’ at the ear’s base.
This tab will allow you to glue your ear to the back of the headband without ruining the bunny ear shape.
With scissors, you can then carefully cut out the bunny ear shapes.
Step 3
Using the white piece of craft foam, cut out smaller versions of the bunny ears made in step 2 for the inner ear section.
You’ll then need to use some craft glue to glue these sections to the inner ear of your bunny ears.
Step 4
Once you have your two bouncing bunny ears, you can then look to attach these to your headband created in step 1.
You can do this by adding glue to the ‘tab’ on each ear section, gluing to the reverse side of your headband.
Step 5
You should then have made the basis of your bunny ear headband or crown, as we like to call it.
This step is the perfect time to get out all your colourful embellishments and decorate your crown with a range of spring colours and symbols.
Whether that’s some foam flowers, hand-drawn bunny paws or even some egg-cellent little pom-pom chicks - the possibilities are endless.
Step 6
Once you have decorated your bunny crown, get the supervising adult to cut out a piece of elastic long enough to keep the headband resting on your head comfortably.
It’s best to stick the elastic to one side, place this around the head it’s being made for and measure how much elastic is needed to meet around the other side.
Step it up
If you’ve got older children getting involved with this craft, you can make this craft more egg-citing by creating 3D flowers to embellish the edge of your headband or crown.
You can do this by cutting out a circle from a piece of card or foam and then carefully cutting it into a spiral shape.
Once you have your spiral shape, roll the card in on itself from the outer edge to the middle.
This shape can then be held into place with a self-adhesive foam circle, where you can place the new tight spiral onto the sticky side to secure.
Egg-cellent egg fancy dress

Once you’ve created your own Easter fancy dress with your bunny ears headband, why not give your Easter eggs the same treatment?
Get in the Easter spirit with this egg fancy dress craft to get all the children egg-cited for the season.
What you’ll need
Depending on your preference, to get cracking, you’ll need to organise:
- hollowed chicken eggs or foil-wrapped chocolate eggs
- googly eyes
- pipe cleaners
- felt
- craft foam
- pom-poms
- craft matchsticks
- and glue dots
First off, you’ll have to get your creative juices flowing and decide which egg you’d like to create.
We’ve outlined a range of designs you can have a go at, but there’s also a chance for you to experiment with a range of egg personalities.
Below, we’ll outline how to create a flower, skiing and bunny egg design.
Flower egg
Get ready for some flower power, the power to keep the ankle biters entertained all afternoon.
Step 1
Start your craft by cutting out four petal shapes from craft felt, and glue these together at a base to sit in a circle.
Step 2
Get your egg and place this where the petals go upwards, and use glue dots to keep these in place.
You can step up this craft by adding felt leaves and a stalk using a pipe cleaner.
Finish off the egg-cellent craft by giving your egg some personality with ‘gooey’ googly eyes.
Skiing egg
Hit the slopes from the comfort of your home with our skiing egg design.
Step 1
Get stuck into your egg design by getting a pipe cleaner and cutting this in half for your egg’s arms. Curl the ends of the pipe cleaners to make little ‘hand’ shapes.
Secure these two pipe cleaners by securing them at the back of the egg with glue or glue dots.
Step 2
Let’s get your eggs on the slopes by using craft matchsticks for your ski poles.
Attach these to the hands using glue or sliding them through a small gap in the pipe cleaner hands.
Step 3
Keep your egg nice and cosy by wrapping a pipe cleaner around the egg to form a woolly jumper, and add a little chenille pom-pom for a hat.
Step 4
Using a foam circle, attach your egg to this as a base using glue or glue dots, and make sure the match sticks are positioned correctly.
Bunny egg
And, of course, we couldn’t forget to include a hopping bunny egg, could we?
Step 1
Start crafting your bunny egg design by getting some craft foam and cutting out two bunny ear shapes.
You’ll need to glue these to the back of your egg with glue or glue dots.
Step 2
To make the feet to allow your egg to stand up, you can outline a pair of bunny feet and join these at the back to create a ‘V’ shape. Glue these to the bottom of your egg.
Step 3
Now it’s time for the decoration.
Cut out a pipe cleaner into four equal lengths, and these will become the whiskers for your bouncing bunny. Attach these to the ‘front’ of your egg.
To give your bunny more personality, cut out shapes from craft foam for a nose and big bunny teeth, and not forgetting the googly eyes to create your new bunny buddy.
Bunny suncatcher

And from one ‘bunny buddy’ to another, why not celebrate the arrival of spring and sunnier weather with this bunny suncatcher craft.
What you’ll need
To get a-hop start on the trend, you’ll need some craft card, coloured cellophane, pom poms, craft matchsticks and some googly eyes.
Step 1
To start on your bunny suncatcher, you’ll need to draw a simple outline of a bunny rabbit onto two pieces of card.
Download a PDF template by clicking on the image below.
Step 2
When you’ve drawn your bunny, cut out a circle, or shape of your choice, in the centre of the design.
Cut out the shapes on each sheet and add glue to the edges of the card.
Step 3
Cover the gap with strips of your chosen coloured cellophane.
Grab your other sheet of card with your bunny outline and glue this on top so you can see the cellophane between the gap.
Step 4
Get in the Easter spirit by decorating your suncatcher with foam shapes, pipe cleaners and maybe even a pom-pom tail to finish off your bunny design perfectly.
Step it up
If you are parents of older children, get their concentration spans tested, under strict supervision, of course, by allowing them to practise their cutting skills with a multitude of mini bunny suncatchers.
Spring bloom pop-up flower card
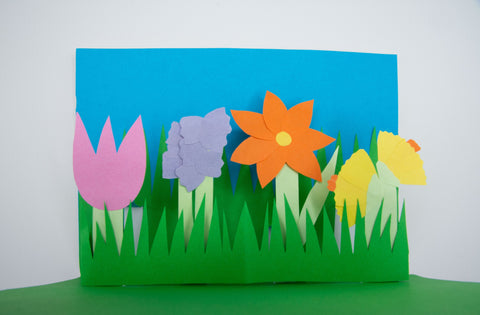
There’s nothing better than sending and receiving handmade cards through the post.
And at a time when face to face communication is virtually impossible, spending your free time making beautiful handcrafted Easter cards is a great way for all the family to pass the time and surprise loved ones.
For some easy Easter cards to make, look no further than a simple pop-up flower card, which adds a spring surprise when opened.
What you’ll need
For this easy Easter craft, you’ll need some craft card, craft paper, a glue stick and scissors, and that’s all. Make eye-catching cards for all your family in next to no time.
Step 1
To start, you’ll need to make the hard decision of deciding what colours you’ll want your card to be.
For example, we have chosen blue for the sky with a green field of grass on top.
If you’d like to do the same, use a green piece of paper and cut along the top edge to create the look of blades of grass. When completed, glue this to the top of your card.
Step 2
Using your card, fold this in half so the grass is on the inside, and along the fold, cut two lines; around 5cm long and 1cm apart inwards.
Repeat this step in the position in which you want your pop-up flower to be placed.
Step 3
Whilst the card is still folded, you’ll need to ‘lift’ these cuts and fold them over to create a ‘crease’ line.
Open your card out and carefully pull up the strip towards the right.
Step 4
You’ll need to test to see if this works by closing the card to make sure the strips lie flat, towards the right.
When you re-open your card, you should see that the strips now stand up to make a corner.
Step 5
And now it’s time to get your creative Easter hat on.
On each stand, you can add any seasonal embellishments of your choice; maybe some bouncing bunnies, Easter eggs or spring flowers to brighten up the recipient’s day.
Once you’re happy with your creations, you’ll need to fold this in half and apply the glue to the ‘wrong’ side of the card inner, avoiding the folding strips.
Make sure to then line up the fold of the centre of the card with your insert so it sits perfectly in the card.
You can then carefully glue the rest of the insert to the remaining part of the card.
Step 6
And now you can really bring out the beauty of spring by creating an abundant floral display to sit beautifully on your card.
Firstly, you’ll need to decide on which flower you’d like to create. We’ve listed a few options below:
- Tulip: you’ll need to create a curved bottom shape and three points at the top
- Daffodils: you will be required to cut out three petal shapes with a wavy edge. Overlap these petals together to make a quarter circle, adding an orange or white daffodil head shape behind the petals
- Daisy: make a daisy by cutting out petal shapes and joining them together to make a circle, with a circle of yellow in the centre
- Bluebells: using blue paper, cut out blue ovals, making sure one edge is cut in a ‘wavy’ shape, and then these can be added to a stalk in a cluster
Whether you try out one flower or give all these varieties a go, you can then get on to making the final spring display.
Add some grass to your floral creations using a piece of green paper, 21cm by 5cm, and cut into long thin points.
Make sure to leave about 1cm at the bottom uncut to ensure the grass can stay together.
Secure by adding glue to the back of the grass and securing this to your flowers behind the pop-up.
Step it up
To make this craft more challenging for older children, you can cut out one large cut, instead of multiple pop-up points.
This larger cut will allow you to create a ‘box’ for bigger items to pop-out such as a bunch of flowers, tumbling Easter eggs or baby chicks in a basket - how cute!
And that’s all, yolks.
Don’t let the kids boredom drive you ‘hopping’ mad. Instead, arrange an afternoon of fun, indoor activities with these easy Easter crafts.
And ahead of your playday, grab everything you need to complete your crafts with our range of crafts supplies and kits to make sure you’ll never run out of all the equipment you’ll need to create your own Easter play pals.
Don’t forget; we’d love for you to send us pictures of your easy Easter crafts; be sure to share the images of your fantastic designs with us on our social media pages.
Subscribe to our youtube channel for more inspo
- Farah Farmah